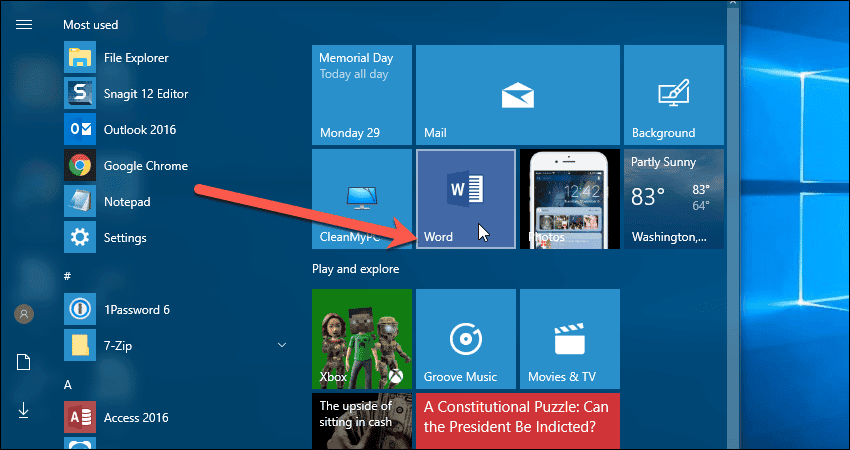
As of the Anniversary Update to Windows 10, the Start menu now has three sections. The section on the far left contains icons for important functions like power options, PC settings, and access to account options. The middle section contains a list of all your applications with automatically generated lists, such as recently added apps or most used apps, at the top. The right section hasn’t changed and still contains all the static and live tiles for your applications.
Access The Start Menu Options In PC Settings
Before we start customizing the Start menu, we’ll show you how to access the menu options available in the PC settings. You’ll be accessing these settings for several of the customizations we’ll be showing you. To access the Start menu settings, open the Start menu and click the “Settings” (gear) icon on the left side of the menu.
On the “Windows Settings” dialog box, click “Personalization“.
Click “Start” in the “Personalization” menu on the left side of the “Settings” dialog box.
The Start settings screen displays on the right.
When you’re done changing the Start menu settings, click the “X” button in the upper-right corner of the dialog box to close it.
Customize The Far Left Menu Panel
We’ll start by showing you how to customize the far left panel on the Start menu. This panel can have a minimum of two icons (the power options icon and your account icon) and a maximum of 12 icons. There is a pre-defined list of icons you can add to this panel and you can enable and disable them in the menu settings. Access the Start menu settings by going to “Settings” > “Personalization” > “Start”. Then, click the “Choose which folders appear on Start” link on the right.
Click the slider buttons to enable and disable the icons you want in the left panel on the Start menu. When a slider button is blue, that icon will display on the Start menu.
The icons you selected show in the left panel of the Start menu.
You can expand the left panel to show the labels associated with the icons. To do this, click the hamburger icon in the upper-left corner of the Start menu.
The left panel expands over the middle one and the icon labels are displayed.
Customize The Apps List In The Center Menu Panel
The center panel contains a list of all your installed apps. By default, the “Recently added” and “Most used” app lists display at the top of the center panel. Below those lists is the list of your apps sorted alphanumerically.
Hide Recently Added Apps & Most Used Apps From The App List
If you don’t like the “Recently added” and “Most used” app lists, you can hide either one of these or both. You can also hide the “All Apps” list and have nothing in the center panel.
Access the Start menu settings by going to “Settings” > “Personalization” > “Start”. To hide the “Recently added” app list, click the “Show recently added apps” slider button so it’s white and reads “Off“. Do the same to the “Show most used apps” slider button to hide the “Most used apps” list.
Now, all you will see is the “All Apps” list.
If you want to hide the “All Apps” list also, click the “Show app list in Start menu” slider button so it turns white and reads “Off”.
With all three options off, there will only be two sections on the Start menu, the icons in the left panel and the tiles on the right. Notice that there are two additional buttons at the top of the left panel when you’ve hidden all three app lists on the center panel. The top button is selected by default and shows the tiles on the menu. The bottom button replaces the tiles with the “All Apps” list. Use these two buttons to toggle between the “All Apps” list and the tiles.
Remove Suggested Apps From The App List
You may have noticed a “Suggested” app list above the main app list on the center panel as well. If you don’t want to see any suggested apps, right-click on one of the suggested apps and select “Turn off all suggestions” from the pop-up menu. If you only want to turn off certain suggested apps, right-click on each app you don’t want and select “Don’t show this suggestion“.
You may not currently see any suggestions in the app list on the Start menu. However, you can still turn off the suggestions in the Start menu settings. Open the Start menu and go to “Settings” > “Personalization” > “Start“. Click the “Occasionally show suggestions in Start” slider button so it turns white and reads “Off”.
Manage The All Apps List
Some apps are added to the Start menu in folders. If you would rather have your apps available directly in the “All Apps” list, you can move them there. Or if you want to create your own folder structure on the Start menu, you can do that too. Note that your apps and folders will still be sorted alphanumerically based on the app and folder names. To restructure the “All Apps” list, right-click on any app in the list. Then, go to “More” > “Open file location” on the pop-up menu.
As an example, we’ll copy the WinSnap application from the WinSnap folder to the main “All Apps” list. So, we double-click on the WinSnap folder.
Then select the application shortcut and copy it (“Ctrl+C”). You can cut it (“Ctrl+X”), if you want to move it. Once you’ve copied or cut the application shortcut, click the “Back to Programs” left arrow to return to the main list of apps.
Press “Ctrl+V” to paste the application shortcut into the main list of apps. You need to provide administrator permission. If your account is an administrator user account, you’ll see the following dialog box. If your account is a standard user account, you’ll see a similar dialog box, but you will also be asked to enter the administrator password. Enter the password, if asked, and then click “Continue” to provide the permission.
The application shortcut is pasted into the main list of apps.
Now, you’ll see the app in the main “All Apps” list.
To quickly jump to a section of the “All Apps” list, click on any letter in the list.
Then, click on the letter you want to jump to.
Customize The Tiles On The Right Panel On The Start Menu
The right panel of the Start menu contains the tiles for some apps, but not all of them. You can pin and unpin tiles in this panel, as well as move tiles, resize tiles, edit tile names, add another column of tiles, arrange tiles into groups and folders, and disable live tile updates.
Pin & Unpin Tiles
To pin an app as a tile in the right panel, find the app in the “All Apps” list in the center panel and right-click on it. Then, select “Pin to Start” from the pop-up menu.
A tile for the app is added to the top group of tiles.
You can also remove tiles from the Start menu. Right-click on a tile you don’t want and select “Unpin from Start” from the pop-up menu.
You’ll notice that when you remove a tile, it may leave a blank space. The Start menu is weird about that. Spaces left by removed tiles are sometimes filled and sometimes not. However, we will fill that empty space in the next section.
Move Tiles
To move a tile on the Start menu, simply click and hold on the tile and then drag it to the position you want. We dragged the CleanMyPC tile to the empty space left when we unpinned the Microsoft Edge tile.
Now, we have a nice tight set of tiles in the top section on the Start menu.
Pin Windows Settings To The Start Menu
If there are some settings you access often, you can add any screen of settings as a tile on the Start menu. Click the “Settings” icon on the Start menu and go to the Settings screen you want to add to the Start menu. We want to be able to change the desktop background easily, so we go to the “Personalization” screen. Then right-click on “Background” under “Personalization” and select “Pin to Start“. This setting’s a bit lesser-known, but quite useful. If you have a few settings that you access often, you can pin them to the Start menu too. Just right-click on any item in the Settings app and choose “Pin to Start”.
Click “Yes” on the confirmation dialog box.
The Settings tile you chose is added to the top section of tiles on the Start menu.
Add a Fourth Column Of Tiles
By default, the tiles section of the Start menu is three medium-sized tiles wide. However, you can add a fourth column one medium-sized tile wide. Open the Start menu and go to “Settings” > “Personalization” > “Start“. Then click the “Show more tiles on Start” slider button so it turns blue and reads “On”.
A fourth column is added, but it is not populated automatically. We moved our “Background” settings tile to the fourth column.
We unpinned some tiles and moved some another tile to the fourth column. Now, we have a tight, four-column layout in the top section.
Edit The Name Of a Tile
You can also rename tiles. For example, we want to remove “2016” from the “Word 2016” tile, because we know what version we’re running. To rename a tile, we rename the shortcut in the Start menu “Programs” folder. To easily open that folder from the Start menu, right-click on the tile you want to rename and go to “More” > “Open file location” on the pop-up menu. NOTE: You can rename tiles for desktop programs and most shortcuts, but not for Universal Windows apps.
In the “Programs” folder, the shortcut for the tile you selected is highlighted. Press “F2” to rename the shortcut and enter the name you want.
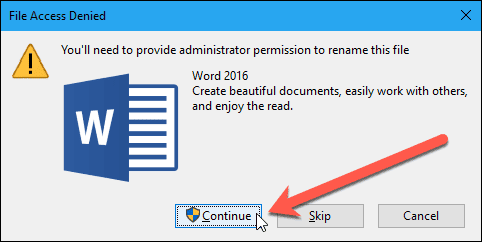
You need to provide administrator permission to rename shortcuts in the Start menu “Programs” folder. If your account is an administrator user account, you’ll see the following dialog box. If your account is a standard user account, you’ll see a similar dialog box, but you will also be asked to enter the administrator password. Enter the password, if asked, and then click “Continue” to provide the permission.
The tile we changed is now just named “Word“.
Arrange Tiles Into Groups & Folders
You can divide your tiles into groups on the Start menu. If you’ve updated to the Windows 10 Creators Update, you can also group tiles into folders. To create a new group, click and hold on a tile. Drag it to the bottom of the Start menu until you see a solid bar. Release the tile below this bar and a new group will be created.
Move the mouse over the bar above the tile until you see “Name group“, and then click on that text.
Type a name for the group and press “Enter“.
You can move other tiles into this group by dragging them below the group heading.
In the Windows 10 Creators Update, you can also group tiles into folders on the Start menu. To create a new folder, drag any tile on top of another tile until the bottom tile seems to expand. Release the mouse button. You can add more tiles to the folder by dragging them onto the folder.
Once you’ve added tiles to the folder, click on the folder to expand it.
Click on a tile to run that app. Click the arrow on the tile above the tiles in the folder to collapse the folder again. If you want to remove a tile from a folder, just drag the tile back out of the folder and drop it directly on your Start menu. You could also unpin the tile from within the folder and then pin the tile for that app to the Start menu again.
You can move folders just like you can move tiles. Simply drag and drop them.
You can also move groups. Click and hold on the bar at the top of the group and drag it to another location in the tiles section on the Start menu.
Resize Tiles
Tiles on the Start menu can be resized. For example, the “Mail” tile is the “Wide” size by default. Four “Small” tiles fit into a “Medium” tile. Four “Medium” tiles fit into a large tile. A “Wide” tile is the size of two side-by-side “Medium” tiles and two “Wide” tiles fit one on top of the other in a “Large” tile. NOTE: Tiles in groups can only be either small or medium sized.
Now the “Mail” tile is smaller, we can move the “Mozilla Thunderbird” tile to the left to fill in the space.
Disable Live Tiles
Live tiles are animated tiles that show useful information such as headlines, weather, updates, etc. If you would rather not see all those tiles flashing their information, you can disable the live tiles. Right-click on a live tile and then go to “More” > “Turn Live Tile off“.
For example, we turned off the live Photos tile and our photo collection doesn’t display on the tile anymore.
You can unpin live tiles from the Start menu the same way you unpin regular tiles. Simply right-click on the live tile and select “Unpin from Start” from the pop-up menu.
Customize General Start Menu Settings
You can also customize the size and color of the Start menu, view the Start menu as the Start screen, and hide recently opened items in the app jump lists.
Resize The Start Menu
You can easily resize the Start menu by simply dragging the top or right edge of the menu with your mouse. To make the Start menu wider, move your mouse over the right edge of the menu until it turns into a double arrow. Click on the edge of the menu and drag to the right.
As you drag to the right, the Start menu widens by one full column of icon groups at a time (three tiles, or four tiles if you turned on “Show more tiles on Start” setting. NOTE: You can only resize the Start menu down to one full column of three or four tiles.
To make the Start menu taller, move the mouse over the top edge of the Start menu until you see the double arrow. Drag up or down until you achieve the height you want.
Switch Between The Start Menu & The Start Screen
If you liked the Start screen in Windows 8, you can recreate that with the Windows 10 Start menu. Open the Start menu and go to “Settings” > “Personalization” > “Start”. Click the “Use Start full screen” slider button to it turns blue and reads “On“.
Now when you click on the Start button, the Start menu displays full screen. The left panel is still available on the left, but the “All Apps” list is only available by clicking the “All Apps” button in the upper-left corner of the Start menu. To view the tiles again, click the “Pinned Tiles” button above the “All Apps” button.
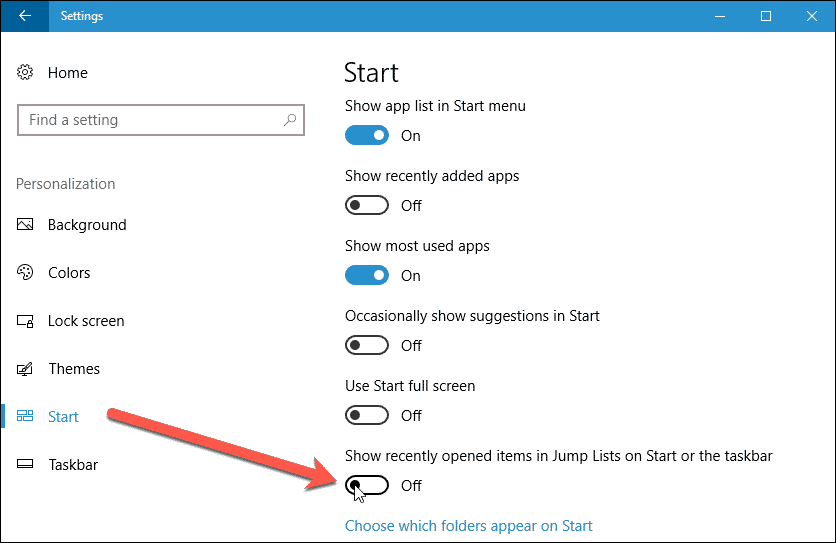
Hide Recently Opened Items In Jump Lists
If you’ve opened documents or performed tasks in an app, those documents or tasks display on what’s called a “jump list”. Jump lists on the Start menu display when you right click on an app’s tile or on the app in the “All Apps” list. They provide quick access to documents in apps like Word, or common tasks like opening a new window in Google Chrome.
Jump lists are also available on Taskbar icons. When you hide jump lists on the Start menu, they are hidden on the Taskbar as well.
If you don’t use jump lists, you can hide them. Open the Start menu and go to “Settings” > “Personalization” > “Start”. Click the “Show recently opened items in Jump Lists on Start or the taskbar” slider button so it turns white and reads “Off“. Now, jump lists will not be shown on the Start menu or Taskbar.
Change The Color & Transparency Of The Menu, Taskbar, Action Center, & Title Bars
You can change the color of the Start menu, Taskbar, Action Center (on the right side of the screen accessed in the notification center) and the color of the title bars on windows. Open the Start menu and go to “Settings” > “Personalization”. Click “Colors” under “Personalization”.
By default, the color of the Start menu, Taskbar, Action Center, and title bars is chosen from an accent color from the desktop background. To pick your own color, uncheck the “Automatically pick an accent color from my background” box. Then, click a color under “Recent colors” or “Windows colors” to select it.
To pick a color you don’t see on the main “Colors” setting screen, click “Custom color“, where you can pick one of many colors or define a color by RGB, HSV, or by hexadecimal color codes. To make the Start menu, Taskbar, Action Center, and title bars transparent, make sure the “Transparency effects” slider button is “On”. You can apply the selected color to the Start menu, Taskbar, and Action Center by checking the “Start, taskbar, and action center’ box. But not to only one of those elements – you have to apply it to all three. The selected color can be applied to the title bars on windows by checking the “Title bars” box. The same color must be applied to all of these elements.
By default, the “Light” mode is applied to settings and apps. If you prefer a dark mode, you can click the “Dark” option. Note that “Dark” mode doesn’t affect every app. Some apps have their own themes or colors that override these settings. There are also some “High contrast settings” you can apply. These are themes that actually make Windows look rather strange. But it’s easy enough to select “None” to turn off the “High contrast settings“.
If you really don’t like the Windows 10 Start menu, you can replace it with third-party tools like Classic Shell or Start10. How have you customized your Start menu? Do you have any other Windows 10 Start menu customization tips? Let us know in the comments. Δ Contact Us :- trendblog.guest@gmail.com


![]()


![]()


![]()